Table of Contents
Worm Lifespans
— Christine Robbins 2018/10/01 13:14
Overview
As always, read the entire protocol before starting a lifespan or scoring a lifespan and if anything is not clear, ASK!
We perform worm lifespans in order to measure changes lifespan caused by RNAi, mutations, or compounds to C. elegans.
Materials
Here you cleanly list all of the reagents and equipment in our lab or elsewhere involved in performing this protocol, with links to our wiki reagent or equipment pages if necessary (make as needed the first time you enter a protocol- a protocol is not complete without completed links to all reagents and equipment). Please include this information in a table
Procedure
Week -2 to -1:
- Maintain your worms strains of interest on NGM+OP-50 at 20°C (unless otherwise indicated)
- Please remember that worms need to be non-starved for at least 4 generations before starting a lifespan. This is because the long-lived phenotype associated with caloric restriction will cause epigenetic changes and will persist through multiple generation
- Make an appropriate number of worm plates for your lifespan.
- Use NGM for lifespans testing drugs or mutants and NGM+Carb+IPTG for lifespans using RNAi
- Make sure you have enough plates! You will need 10 per condition initially and you will want to have about 3x that number of plates on hand, ready to go when worms need to be transferred
- When plates are dry, seed them with 50µL of the appropriate bacteria (freshly overnighted in selectable media if applicable) to the center of the plate. Allow to grow at room temperature for at least 48 hours.
- OP-50 will be the strain we use when testing drugs or mutants and L4440 will be the control strain for RNAi experiments
- If using drugs (like antibiotics) you will want to grow up the lawn for about 4 days before stratalinking the plates to be sure that worms will not run out of food rapidly and then add drugs to the plates.
- When you are ready to start your lifespan, do a final chunk of your strains to at least 4 plates, this will ensure that you have enough egg-laying adults to start your lifespan
Remember to have a well defined system for color coding your plates. This system needs to be clearly indicated in your notebook, on a sheet with the plates and in the dropbox lifespan folder! Please only use the following colors to avoid confusion- Red, Blue, Black, Brown, Green, and Lime Green may be used to indicate stratalinking.
Day -2: Picking Eggs
- Label all of your plates with the following information: initials, date, lifespan number, plate number, plate condition, and worm strain. See an example below. This can be done the day before if you plan ahead. You will need a pick plate, a butt ton plate and 8 experimental plate (1-8)
- We set up lifespans by performing a lay-off of all strains. This ensures that all eggs were laid within a few hour of each other. This is incredibly important when using drugs or strains that delay development of the worms.
- Lay-off by chunking:
- Chunk from plates that have a large number of adults full or eggs to new large NGM+OP-50 plates that have been stratalinked. It’s better to use more chunks and plates to ensure that you have enough eggs (3-4 plates per strain, or more)
- Incubate the plates at 20°C for 2-4 hours
- Pick 12-15 eggs per plate for all experimental plates and 20-30 for your butt ton plate.
- This method works great because you know that all eggs outside of the chunk were paid within a certain time frame
- Lay-off by transferring adults:
- Transfer a few hundred adults for each condition to a large, stratalinked NGM+OP-50 plate
- Transfer 5 adult worms full of eggs to your lifespan plates (transfer 10 to your butt ton plate), add more adults to your initial plate as needed, but ALWAYS do a 2-step transfer
- Incubate at 20°C for 1-4 hours, checking every hour for eggs
- When you can see at least 12 eggs per plate, remove ALL adults from the plate. Have someone double check that you got them all
- This method is less ideal, but is necessary for some more delicate strains like atg-18 worms
Day 0: Adding FUDR
ADDING FUDR SHOULD BE DONE WHEN WORMS ARE LATE-L4/EARLY ADULTS, NO SOONER. IT IS BETTER TO DRUG THEM LATE THAN EARLY IF YOU ARE UNSURE OF THEIR DEVELOPMENTAL STAGE. FOR MORE INFO ON FUDR, CLICK HERE.
- Check your worms to make sure they are ready, not all conditions will always be ready at the same time. Make sure you are checking plates regularly
- Thaw 100x 10mM FUDR from the -20°C freezer
- To each of your plates, including the butt ton add 10µL 10mM FUDR to the center of the plate and 40µL to the outside edge
- Swirl the plate to ensure that the FUDR on the edge travels all the way around the plate
- Return plates to the 20°C incubator
Day 1: Fix and Score your lifespans
Day 1 = day 1 of adulthood
- Make sure you have a folder in the lifespan dropbox for your lifespan labeled DATE-LS####-DESCRIPTION where DATE is Day 1 of the lifespan
- Fix all plates to 12 worms per plate. Remove extra worms and add worms from your butt ton plate as needed
- Score all of your plates in the lifespan and record this in the worm lifespan template (be sure to fill in all appropriate information)
- The butt ton plate can be discarded when done
Day 2 → death: Score your lifespans
- From here on out, score the lifespan daily being sure to transfer worms when appropriate, record every transfer, and record the OD600 of bacteria when all worms are dead and removed (see notes for more info)
Notes
Notes on scoring worms:
- The total number of worms for the current day should always add up to the number of alive worms the previous day
- If you cannot find a worm, check the edge of the plate and always move any straying worm back to the center of the plate
- Make sure that you indicate on the spreadsheet when worms are dead or censored (exploded, bagged, or missing) and ALWAYS remove the worms form the plates
- Dead: before calling a worm dead, be patient. Boop it’s head and butt multiple times, wait, and repeat until you are 100% sure that the worm is dead
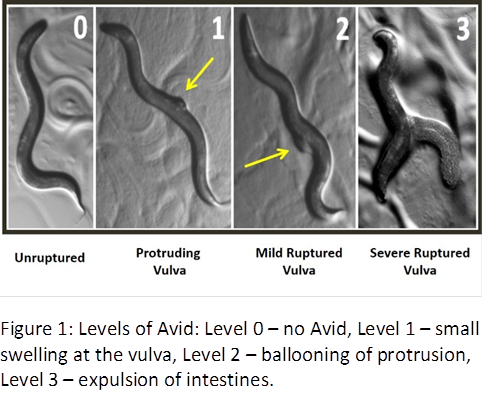
- Exploded: when a worms gonad comes out of it’s vulva. This will lead to an early and “unnatural” death and needs to be censored as soon as it is detected and is “level 2” http://kaeberleinlab.org/projects/identifying-cause-of-exploding-worms

- Bagged worms or bag of worms: When a worm’s eggs hatch inside of her, causing her to die and eventually devoured by the progeny. Again, this needs to be censored as soon as it is detected
- Missing worms: This is a broad category for any worm that can not be recovered. This can include: worms who have crawled up the side of the plate, worms that are in contamination, burrowed worms that you are unable to retrieve, worms touched with a hot pick, etc…
Notes on transferring worms:
- Reasons to transfer worms: contamination (anything growing on the plate that should not be there), hole in the plate, burrowed worms, progeny (FUDR is not perfect)
- IF A PLATE NEEDS TO BE TRANSFERRED, DO IT! LAZY SCIENTISTS LEAD TO REPEATED EXPERIMENTS AND WASTED TIME!
- Always perform a 2-step transfer when moving worms especially from contaminated plates or plate with progeny. This means that you transfer all worms to a new plate of the same condition (this can be re-used unless being used for contaminated worms or it has too many babies), wait a few minutes for worms to move around and then transfer them to their final labeled plates
- FUDR needs to be added to all plates until worms are 10+ days old. At this point they are no longer producing eggs
- RECORD ANY TRANSFER IN THE LAST SHEET OF THE LIFESPAN FILE. THIS INCLUDES: CONDITION, PLATE #, DATE, INITIALS, REASON FOR TRANSFER
Notes measuring OD600 of bacteria:
- When you remove the last worm off of any plate you MUST to measure the OD600 of the bacteria on the plate right away and include it in a spreadsheet for that lifespan (OD600-Bacteria-Template)
- Note: OD600 is only meaningful when the value is between 0.1 and 1
- Using a P200, dispense 100ul of dH2O water on to the finished plate
- Use the flat end of a lab scoop to gently resuspend all bacteria into the water without ganking up the plate surface
- Swirl the water gently, then tilt the plate to pipette the 200µl and dispense into a LABELED 1.5ml flip top tube and close
- Dispense the water/op50 by pipetting up and down to resuspend then putting it into one well of a clear 96 well plate
- Run the Full Plate OD600 protocol on the Victor Nivo
- If OD > 1, dilute as needed until 0.1<OD<1 and re-measure and calculate your original OD
- Example: If you diluted 10x and read OD0.4, your real OD in 100ul was 4
- If you need help with dilutions, please re-visit the dilutions worksheets in the lab dropbox and then ask for help
- Note the final OD and any dilutions done in the spreadsheet
- When done, rinse the 96 well plate with soap and water, rinse with ethanol and do I final rinse in diH2O and allow the plate to dry
Part Numbers
list the full manufacturer name and manufacturer part number for all reagents, and then for all equipment. If these already have wiki pages you should be able to get the numbers there. PART NUMBERS will always have two sections, first Reagents and then Equipment. Please place these items in 2 tables.